Showing posts with label wall art. Show all posts

Sunday, October 20, 2013

Alphabet Wall Art for Nursery

As promised, I will update more often and keep track the best I can of all the little projects I'm working on for the nursery for Baby Boy Coghill!
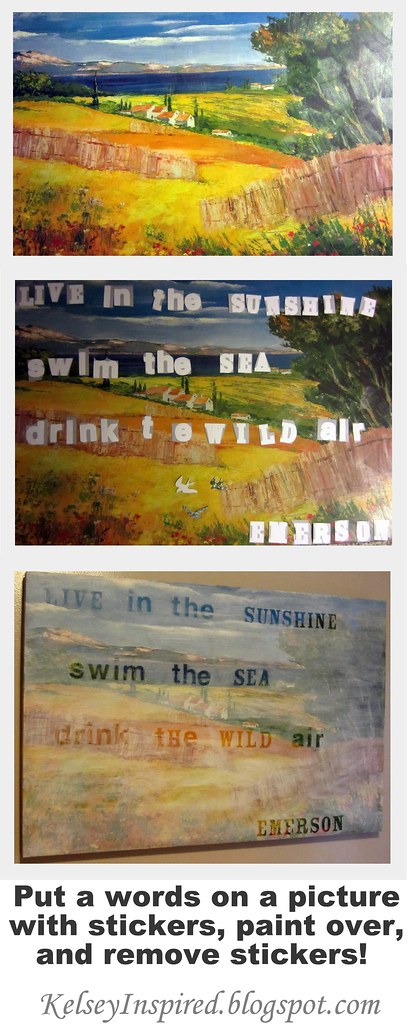
The intended "theme" of the room is black-white-and-bright!!

First, I'll share this alphabet art I made over the weekend.  It was super easy to do and took pretty much 0 art skills, promise.
I've seen tons of versions of the alphabet on pinterest and knew I wanted to make my own, and when I found the absolute perfect vinyl letters on clearance at Target I knew it'd make the project so much simpler than painting them by hand.

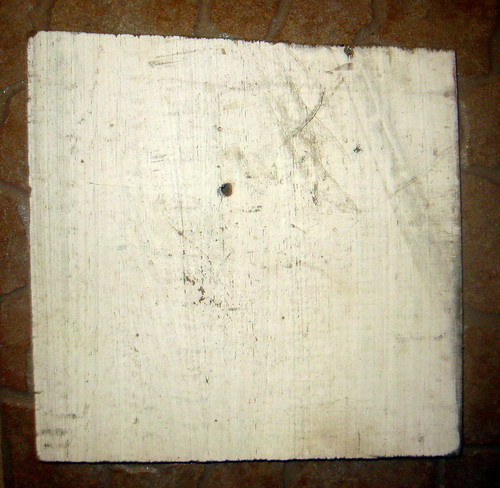
I started with a large canvas that I literally found in the trash!
My sister was in town visiting and we walked over to a nearby park on a Sunday afternoon, and Monday is garbage day so there was tons of stuff out.  That day I found a suitcase, Christmas ornaments, a large decorative frame, and this barely used canvas!
I figured someday I'd paint over it or find some use for it - canvases this large are not cheap.

Supplies: Canvas, letters, and white paint. 

  I started out with a few coats of white paint over someone else's failed attempt at an art project 

 Cut out each of the letters and decided what type of configuration I wanted.  I ended up putting 6 letters on the second row since F and I are such small letters. 

 Stuck them to the canvas and put it up on the wall to study it.... but it seemed like something was missing.  I didn't originally intend to have it off center (haha. maybe I shouldn't admit to that!) but once I put up the first row it was a little heavy to the left, but whatever, I just went with it figuring I'd find something to fill the space later. 

 I decided it needed some color!  So I found some scraps of paper I had lying around and played off the tribal-ish look of the letters and cut out a bunch of little triangles to get an arrow look. 

Final product!
I'm so happy with how it turned out and since we live in a rental and can't paint the walls the bright white of the canvas really brightens the room up.

I can't wait to have a little one living in this room and to someday teach them their ABCs!!!

linking up with Savvy Southern Style!

Tuesday, June 12, 2012

DIY : recycle old painting with quote art


Well like all other breathing 25 year olds the majority of my inspiration comes from pinterest these days.
I found a DIY art project I wanted to try

                                                                         Source: craftgawker.com via Kelsey on Pinterest


I had a painting under my bed for at least 10 years (no joke) that I picked up at a yard sale and had always intended to re-purpose.  I liked it because it was large, and have a good frame so I could easy re-cover it with canvas and paint a new picture or something.
Well flash forward a decade and I saw this and remembered my sad, forgotten painting.  And then I breathed new life into it and it proudly hangs above our bed.

This is SUPER easy to do.
promise.

All you need is:
  • a painting or some type of picture with colors that you like
  • paint - I used cheapo white acrylic paint from Hobby Lobby for $1 and then added a little paint thinner because I wanted some of the original artwork to show through
  • letter stickers - I bought some on clearance at Jo-Anns
  • a paint brush
  • time 
Choosing a quote is probably about the hardest part.  I had so many ideas running through my head... but I ultimately decided on this one because I love it so much.  It has a special meaning to me ever since we lived in Grenada.  We lived in the sunshine, swam the sea, and drank lots of wild air...... 


I love how Emerson turned out.  The colors are perfect behind the words.


the bedroom isn't finished as of yet.... just this lone painting hangs on the wall.
my husband said "do all these patterns go together"
ummm not exactly. and I like it that way.


Friday, June 8, 2012

Free Find Friday!

Since moving to this awesome new neighborhood I have decided to start a weekly series called Free Find Friday because I keep finding awesome stuff!!

I'd like to start off with this amazing photo I found on the side of the road on our way home from church.  On the curb there was a huge pile of stuff - couch, boxes, chairs, and this.
My sweet husband took one look and said "you want to stop"
So out I got in my dress and heels and rummaged through and found this gem.
A photo of the Flatiron building in NYC professionally framed and in perfect condition.  It is about 24 x 36 inches.


It now lives in my kitchen.
My not completed kitchen..... but I'll share a little peak with you.....


It's not finished yet, hence why I can't show you a whole view of the room or even that chair in the front or the floor :/ haha but soon!
This is my little craft area I've carved out for myself in our kitchen, since the spare room is dominated by my husband who apparently has to study because he's going to be a doctor or something.......


Do you have great garbage in our town?? Find anything great on the side of the road lately?? Or maybe something "nearly free" from the thrift shop?? Share with me!


Sunday, February 12, 2012

Emboridery Hoop Decor

Ok, how do you working bloggers do this?
When do you find the time to blog?
Do you schedule several to post throughout the week?

I started my blogs while I was in Grenada without a real job, per-say.
I've only been working consistently for about a week and I am so behind!
and let's face it, it doesn't take much for my blog to fall to the way side.

 I have been busy working, making wreaths, going to church, and having a life... which leaves little time for blogging. imagine if my husband was here currently.

I really love blogging and sharing ideas and projects with others and reading up on other people's lives and such too, so I am determined to not quit!

Here is a little project I did in about an hour for a friend's "sprinkle" for her second baby :)
I love that all my friends have pinterest (even if it is a little annoying because I feel like I never get to have an idea all to myself without 100s others pinning it too. anyway) I can look and see what they like and it comes in handy when gift buying!!
My friend had pinned several embroidery hoops so I decided to make some with her girl's names on them!
Turns out she had already decorated the their room, but my two additional hoops fit right in!!

011


008


010


Better yet, I got these hoops at the Goodwill for .59cents and .39cents!

Tuesday, September 20, 2011

That darn cabinet.

Do you remember that horribly awkward cabinet I have dividing my living room and kitchen?
I am still on the mission to cover up the glass panes and hide all my dishes and food that fills these cabinets.
but I think the cabinet is winning.

IMG_7826
This is our apartment on the day we moved in.
I can't believe how empty it looks.  Where did I get all of this stuff?!
oh yea. from the trash...
Halloween Party Last year
the cabinet looks slightly less cluttered because I was literally using all our dishes for the party.
and um like jello much?
Christmas snowflakes
so apparently the bottom looked so bad I just cropped it out.


And this is what it looks like today:

IMG_0355

I only had 2 sheets of tissue paper left, and they're not even the same color, but it is more noticeable in this photo than it is in real life, and they aren't big enough to cover the entire glass, so I added the newspaper to tie into the newspaper roses I made and for more texture, but I still don't know about it.
I want it to look full and complete, but not cluttered, you know?

Glass panes aside, I love the top shelf. 

IMG_0395
that wine bottle again! 
I don't even drink wine, I just like the bottle.  I picked some flowers and berries & bam fall decor!
That triangle is a piece of wood I found wrapped in twine & the basket really deserves a post all of its own... it is a Calabash.  A fruit  that I picked, carved out like a basket, and let dry.  They sell them in the markets here.  When I get home I'm probably going to paint it. or not. I like the color and texture.
IMG_0191
remember when I made magazine roses? well newspaper roses are even better!
I love the texture and they are much easier to mold into shape.
IMG_0222
love my sign from the ditch!

Do you have a problem area in your home that you're always trying to cover up or fix?
I'm open to suggestions for mine!  But remember that I don't have a Target or Goodwill to run to buy something...


Sunday, September 18, 2011

beauty from the rubbish

You're going to think I'm crazier than ever... but last week when I went on my twig hunt {and came home with that sign} I also came home with a random piece of metal wire, kind of like that used for a cage or something.
When I first saw it I thought it would be great to hang my earrings on, I've seen similar DIYs all over the internet, but once I started looking at it, I got a different type of inspiration. 
I have been drying some different flowers and leaves for fall decorations and decided that the rusted wire and the dried flowers would be a great combination.

IMG_0157

Putting the fear of tetanus aside I began flattening out the wire and trimmed it down to about a 10x10in square.  After cutting the wire I bent the sharp edges down.

IMG_0163

Arranged the dried flowers and hot glued them to the wire.
IMG_0186

Added a little lace across the top for a hanger.
IMG_0189

And since my hanging options are limited... I temporarily hung it from the light switch.
IMG_0357
side note: see that red switch? it's to turn the heat on for our shower! crazy!


This week I'll be sharing some more of the little bits of fall I'm bringing into our home! 
Who's to say that because it's still a tropical island outside it can't be autumn in inside? :)


Friday, September 16, 2011

almost copy-kat art

One of my character flaws is that I don't like to copy things (hence my love/hate relationship with pinterest) 
I want to be creative all on my own. be original.
But the truth is.... I'm not really all that one of a kind.
Many of the ideas I have seem original to me, but someone else has already thought of it.
To deal with this I'd like to call myself the "almost copy-kat"
I see something I like and then try to put my own spin on it.

I am a supporter of trying to re-create art for yourself.
Art is so expensive. eesh.
I'm that over-confident person who refuses to buy anything that I think I can make myself.
Sometimes it turns out good... and sometimes it is just an outlet for when I get that urge to paint or draw.

Last week I tried my hand at re-creating a favorite image of mine from pinterest.
that sea horse I used for inspiration for my sea glass sea horse.


I used some really thin sharpie markers that my friend from college Tiffany gave me when I was home.  She donate SO much awesome stuff to our after school program - the kids love the books she sent and I've been getting lots of use out of the sharpies! and not just for art purposes ;)
Tiffany has a super cute blog - Teach.Run.Love.
If you like running (she's about to do her 4th half marathon), teaching 1st graders, or cooking check her out!

ok end of commercial break.
back to sea horses.

IMG_0165
my version.  It is draw on 8x10 paper.

But I couldn't stop there.  I was loving this so I decided to draw a fish in a similar style.

IMG_0167

But you can't stop at 2.  You need at least 3 for a "collection"
So I drew a little jelly fish!

IMG_0168

IMG_0164


The similar style and colors makes them a beautiful grouping!  I cannot wait to frame and display them on a gallery wall when we get an apartment in America!


Tuesday, August 16, 2011

She's here!

My online blogging buddy Cat is finally here in real life person!
Many of you may be Budget Blonde readers already, remember when I guest posted over there?
Cat's husband is in the MPH/MD program at the same school as my husband and I sorta met Cat online,  baked her husband a cake, soon became friends, and this week finally met each other face to face!
In case anyone is wondering... she is every bit the lovely southern lady she portrays on her blog :)


I wanted to do something nice for her upon her arrival in Grenada, so I baked her a loaf of banana bread.... but when I was pulling it out of the oven I sorta dropped it & the bread fell out of the pan! I was scrambling to get it, burnt my arm, and the bread fell apart. and there were no more bananas. fail.

So I decided I'd make something for her apartment... but I couldn't think of anything until I remembered a post she did about a painting she liked of a ballerina.
I got out my sketch pad, charcoal, and chalks (no paint or canvas) and went to work.... I was happy with how it turned out until I got back on my computer & realized that I need to scroll down, the whole image wasn't showing on the screen.... I didn't give the ballerina feet.  isn't that the most important part? fail.


poor footless ballerina.
Helpful tip - if you make a drawing out of chalk or charcoal you can spray it with aerosol hairspray afterwards and it doesn't smudge!  Good thing a friend had some I could borrow!
we all know I don't fix my hair in Grenada :)


Friday, August 5, 2011

Wall Art on the cheap


This is the wall over our tiny little kitchen table (only big enough for 2 chairs)
and I thought I'd share with you what this array of random stuff is!
  • The painting of the man and woman dancing is cut out of a magazine.  I just loved both the painting and the long vertical shape of it.  (free... not my magazine :)
  • The silverware is drawn on black paper with white chalk.  don't touch it or it will smear. lol (cheap and easy!)
  • The black square is electrical tape (cheap)
  • The picture is my husband and I from our engagement pictures stuck inside of a card and taped to the wall. (cheap)
  • The bird is cut out of a grey paint sample (free!)
  • The chain of flowers is made out of toilet paper rolls!  (free!)
  • The purple frame is also a cut up paint sample (free!)
Wall art for pennies!  
And.... it is all paper products and light weight because our walls are concrete so everything must be taped up.. or hot glued. which I have found works great! 

Hanging above is my $4 Ikea paper lantern light.  I brought this in my suitcase with me because I just knew the lighting in this apartment would be horrible.  and I was right. we basically have outdoor porch lights inside.
you can read about how I covered up one of those lights here.

My favorite thing about this wall is how it all came together from random scraps and the ascending flow.
note don't be afraid to play around with the placement of  your wall art.


Confessions of a Stay At Home Mommy


Tuesday, July 12, 2011

decorating with beach finds #4

I am constantly collecting shells here in Grenada.
but what do you do with them all? 
make art of course.

I started with another piece of wood I found on the side of the road (lots of wood lying around here evidently)
IMG_5499

Then a collection of random shells in various sizes and colors
IMG_5500

Then armed with a hot glue gun I created a heart out of the shells.
IMG_5506

and finished it off with some twine wrapped around the edges to frame it.
IMG_5503
it is not perfectly square and I like that about it, so I used to  twine border to emphasize it.


want some more shell projects?
shell windchime
shell display 
conch shell planters 

Linking up with :
The DIY Showoff
Craft Confessions 
Tip Junkie
Handmade Tuesdays @ Ladybug blessings 
Take a look Tuesday @ Sugar Bee Crafts
Funky Polkadot Giraffe 
Reasons to skip the housework
Coastal Charm 
Christina's Adventures


Related Posts Plugin for WordPress, Blogger...