it's 2:15am.
good thing I don't have to work tomorrow morning!
I've successfully watched 3 movies and spent hours re-doing this blog.
I just wasn't content with the way it looked and for about 20 minutes seriously considered paying someone to make it look more cohesive and professional and beautiful.... until I saw how much people are charging.
yea. right.
this girl is cheap.
So I googled about 1000 tutorials on how to do all sorts of html things that I'll never remember.
Thanks all you other people who understand and did all the work for me to know how to center things and create spaces and such :)
New things?
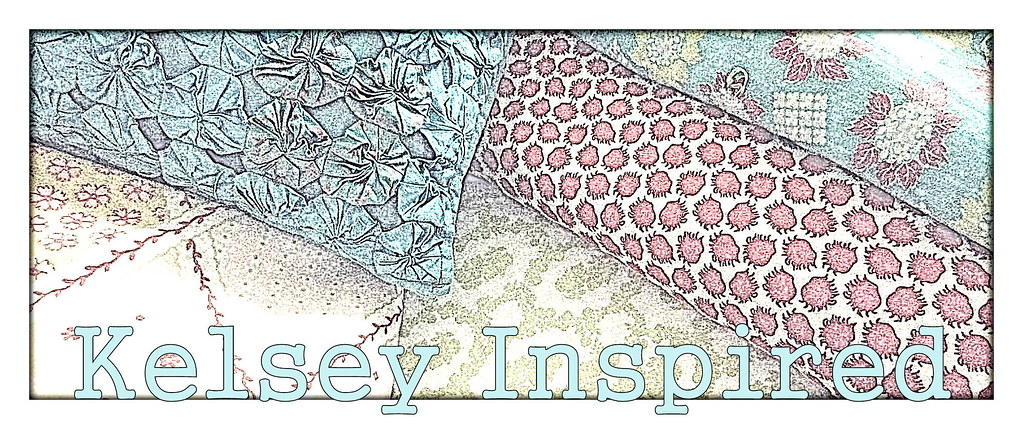
Well I did a new header using the picture I took of the vintage linens on my bed.
Yep that background is my sheets, duvet, and pillowcases! pretty nifty huh?
I made it using only Picasa..... because you might have guessed that my world came crashing down when Pincik went out. Picasa is no way nearly as good. I want to play more with font and layers than it allows, but whatev.
I edited it using a few combinations of effects including pencil sketch and cross process to name a few. Basically I just keep clicking and adjusting things until I'm happy.
I also made buttons for pinterest, instagram, twitter, and my other blog using the same photo.
I just cropped sections of it to a square, added text, and uploaded them to flickr, and then linked the photo to the appropriate url.
Let's see what else..... um I made all the links open in new tabs and removed about a billion unnecessary things that were crowding up the space, like all the blog buttons (which no one ever looks at or clicks on) and cleaned up my label cloud and moved everything to one side so there is more room for the actual blog post and pictures.
I need to do some serious work on my photography skills I've realized..... so frustrating to take pictures of a house with not very many windows and a little point and shoot. boo hoo me.
So yea! Here's a fresh look for a while!
Now I need to work on my other blog..... Coghills in Michigan just doesn't inspire me quite the same as Coghills in Grenada did............... :)
Showing posts with label blog headers. Show all posts
Showing posts with label blog headers. Show all posts
Tuesday, June 26, 2012
Saturday, September 17, 2011
Saturday Afternoon Picnik - collage
A couple weeks ago Picnik started allowing you to layer photos. Before this my biggest complaint about Picnik was the limited collage options. I used Picasa to create the collage and then added text and effects with Picnik... well not any longer! I can do it all in 1 place!
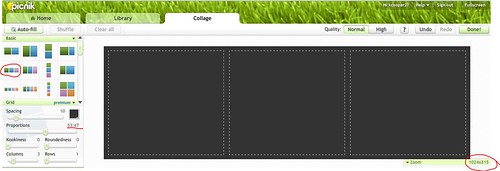
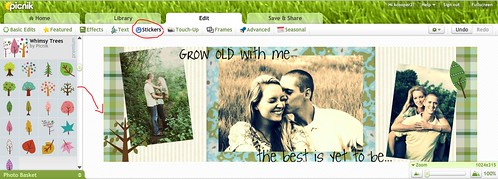
This is an example of how I would make a blog header.
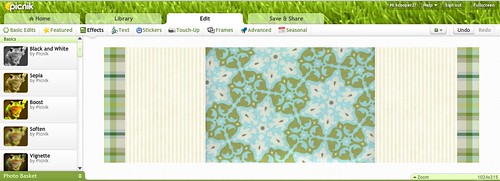
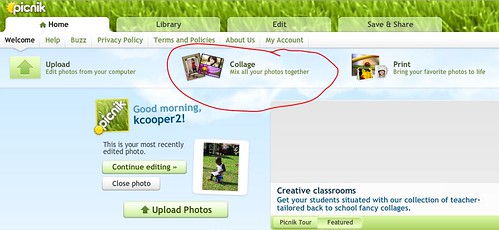
Start by selecting collage on the main page.
I chose the 3 box collage, but only for the shape. Remember you can move and adjust the pictures in any way you want, and use way more than 3 images!
In the bottom right corner it says the dimensions... around 1000x400 is a great size for a blog header. Adjust the proportion to change the dimensions.
Click 'Done' and now you are ready to add pictures from the 'Photo Basket'
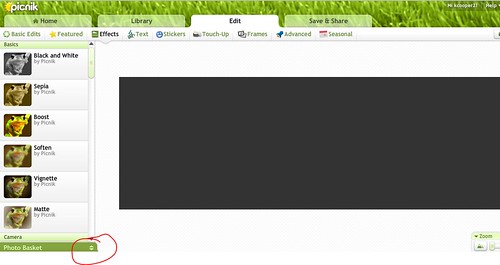
I start by adding the background images... scrapbook paper, fabrics, or patterns I have created from colourlovers.com
I used a muted green and blue color scheme and added the plaid to get a bit of a fall look.
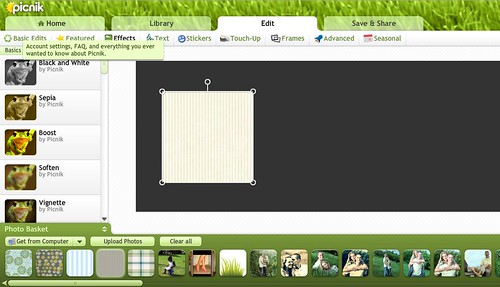
By right clicking on the images you can change the order in which they are layered.
For instance the plaid is much larger than what is shown here, but it is layered behind the stripes. I right clicked and said 'send to back'
Next I added the images of Lee and I that I wanted to use.
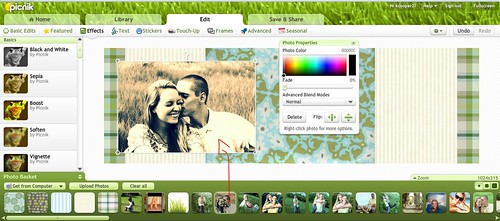
Once you have all the images in place how you want, now is a good time to save it. Saving it before you added text or stickers allows the layers to be secured so you don't accidentally drag a photo when you meant to drag the text (trust me it can get frustrating when you're dealing with lots of layers & as of yet Picnik doesn't have a grouping feature to lock in the layers).
It also allows you to go back later and add different text or stickers to the collage if you decide you want something different.
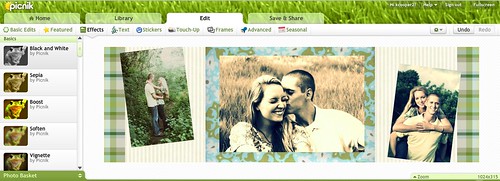
Once it is saved upload it to Picnik and open it as you would any other picture to be edited.
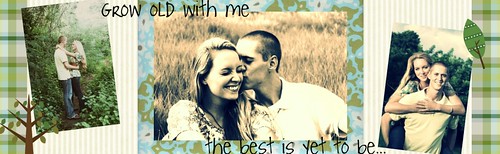
Next add text if you want to. This is from one of my favorite songs...
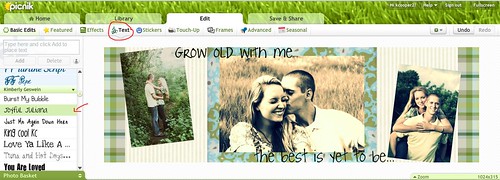
I added a few 'whimsy trees' to my collage since it is fall after all.
And you're done!
Today I signed up with Picket Fence Blogs! and I realized that my blog button was super tiny... but hopefully that's fixed now! Both are on the sidebars... let me know if you have any feedback for me.
Have you been picnik'ing anything fun??

This is an example of how I would make a blog header.
Start by selecting collage on the main page.
 |
In the bottom right corner it says the dimensions... around 1000x400 is a great size for a blog header. Adjust the proportion to change the dimensions.
Click 'Done' and now you are ready to add pictures from the 'Photo Basket'
I start by adding the background images... scrapbook paper, fabrics, or patterns I have created from colourlovers.com
I used a muted green and blue color scheme and added the plaid to get a bit of a fall look.
By right clicking on the images you can change the order in which they are layered.
For instance the plaid is much larger than what is shown here, but it is layered behind the stripes. I right clicked and said 'send to back'
Next I added the images of Lee and I that I wanted to use.
Once you have all the images in place how you want, now is a good time to save it. Saving it before you added text or stickers allows the layers to be secured so you don't accidentally drag a photo when you meant to drag the text (trust me it can get frustrating when you're dealing with lots of layers & as of yet Picnik doesn't have a grouping feature to lock in the layers).
It also allows you to go back later and add different text or stickers to the collage if you decide you want something different.
Once it is saved upload it to Picnik and open it as you would any other picture to be edited.
Next add text if you want to. This is from one of my favorite songs...
I added a few 'whimsy trees' to my collage since it is fall after all.
And you're done!
Today I signed up with Picket Fence Blogs! and I realized that my blog button was super tiny... but hopefully that's fixed now! Both are on the sidebars... let me know if you have any feedback for me.
Have you been picnik'ing anything fun??
Wednesday, March 23, 2011
new blog header
spruced things up a bit over at the Coghills in Grenada page.
I hate to have my blog look the same for very long.
as soon as I get a great idea I'll probably be changing this one. I don't love it anyway.

and here are some that I've done for my friends
 Michelle over at - http://mavyboo09.blogspot.com/
 Kristen at - http://kristenann11.blogspot.com/ (Kristen and Michelle are identical twins and by bestest friends since 1st grade!)
 Lea and her adorable little family over at - http://rolandbaby.blogspot.com/
and she's actually on a new header that I made for her, but this one is my favorite :)
these were all done using Picasa (& now Picasa is linked with Picnik! I am an avid picnik-er!)
want to see more of my amateur blog headers?? click here
someday I'll learn how to do the fancy stuff. maybe
I hate to have my blog look the same for very long.
as soon as I get a great idea I'll probably be changing this one. I don't love it anyway.

and here are some that I've done for my friends


and she's actually on a new header that I made for her, but this one is my favorite :)
these were all done using Picasa (& now Picasa is linked with Picnik! I am an avid picnik-er!)
want to see more of my amateur blog headers?? click here
someday I'll learn how to do the fancy stuff. maybe
Subscribe to:
Posts (Atom)