Wednesday, September 21, 2011

What I Wear Wednesday - Shoe Edition

Here's another glimpse into my life. 
I went home in May after being in Grenada for about a year and half and when I went into my old bedroom at my parents house I couldn't believe how much stuff I had forgotten I owned!
Living here with only what we could fit into 2 suitcases is a little tiring and I sometimes start to feel sorry for myself like like I don't have anything to wear and no where to go buy something new.
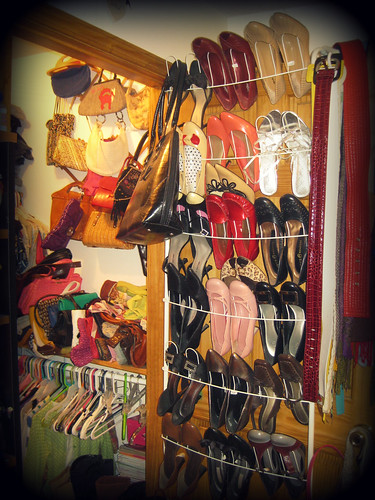
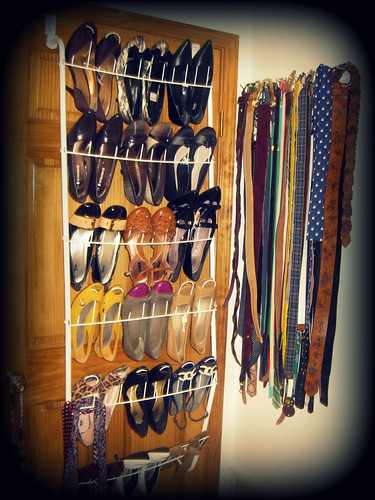
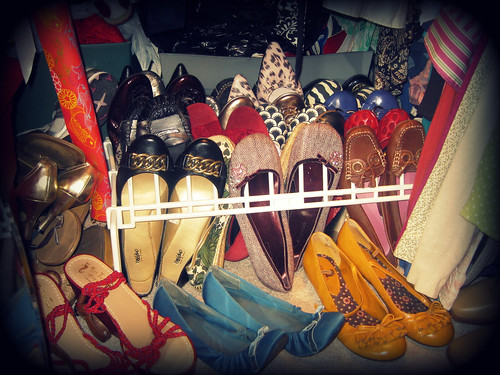
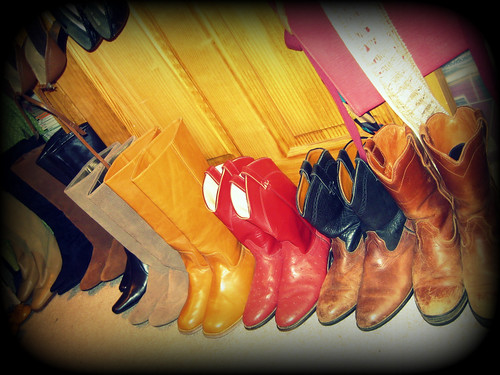
So to remind myself that I actually do have belongings in Ohio waiting for me I decided to take pictures of my closet to look at whenever I felt the shopping urge.

My favorite things in my closet are my shoes.
I am a super thrifty shopper, and since I'm so cheap I usually end up buying lots of things.
I know it's a problem.

In my hometown we have a Target outlet. you heard right. it could also be named Almost Heaven.
Pretty much anything Target has this outlet has.  I don't understand how or why. it's not used or damaged usually. Everything is practically under $5.  Can you blame me for buying 3 pairs of shoes per week before I was married?

So on days like today when I am totally over the Old Navy flip flops I live in, in Grenada I look at these pictures and remember the days when I had a reason to get dressed up and wear real shoes.

IMG_4681-1


IMG_4679-1


IMG_4678-1


IMG_4675-1

And I'd like to say a huge thank you to my Mom and Dad for allowing me to leave my bedroom exactly how it was when I was in college. 
Maybe they secretly like that it still looks like I live there :)


Tuesday, September 20, 2011

That darn cabinet.

Do you remember that horribly awkward cabinet I have dividing my living room and kitchen?
I am still on the mission to cover up the glass panes and hide all my dishes and food that fills these cabinets.
but I think the cabinet is winning.

IMG_7826
This is our apartment on the day we moved in.
I can't believe how empty it looks.  Where did I get all of this stuff?!
oh yea. from the trash...
Halloween Party Last year
the cabinet looks slightly less cluttered because I was literally using all our dishes for the party.
and um like jello much?
Christmas snowflakes
so apparently the bottom looked so bad I just cropped it out.


And this is what it looks like today:

IMG_0355

I only had 2 sheets of tissue paper left, and they're not even the same color, but it is more noticeable in this photo than it is in real life, and they aren't big enough to cover the entire glass, so I added the newspaper to tie into the newspaper roses I made and for more texture, but I still don't know about it.
I want it to look full and complete, but not cluttered, you know?

Glass panes aside, I love the top shelf. 

IMG_0395
that wine bottle again! 
I don't even drink wine, I just like the bottle.  I picked some flowers and berries & bam fall decor!
That triangle is a piece of wood I found wrapped in twine & the basket really deserves a post all of its own... it is a Calabash.  A fruit  that I picked, carved out like a basket, and let dry.  They sell them in the markets here.  When I get home I'm probably going to paint it. or not. I like the color and texture.
IMG_0191
remember when I made magazine roses? well newspaper roses are even better!
I love the texture and they are much easier to mold into shape.
IMG_0222
love my sign from the ditch!

Do you have a problem area in your home that you're always trying to cover up or fix?
I'm open to suggestions for mine!  But remember that I don't have a Target or Goodwill to run to buy something...


Sunday, September 18, 2011

beauty from the rubbish

You're going to think I'm crazier than ever... but last week when I went on my twig hunt {and came home with that sign} I also came home with a random piece of metal wire, kind of like that used for a cage or something.
When I first saw it I thought it would be great to hang my earrings on, I've seen similar DIYs all over the internet, but once I started looking at it, I got a different type of inspiration. 
I have been drying some different flowers and leaves for fall decorations and decided that the rusted wire and the dried flowers would be a great combination.

IMG_0157

Putting the fear of tetanus aside I began flattening out the wire and trimmed it down to about a 10x10in square.  After cutting the wire I bent the sharp edges down.

IMG_0163

Arranged the dried flowers and hot glued them to the wire.
IMG_0186

Added a little lace across the top for a hanger.
IMG_0189

And since my hanging options are limited... I temporarily hung it from the light switch.
IMG_0357
side note: see that red switch? it's to turn the heat on for our shower! crazy!


This week I'll be sharing some more of the little bits of fall I'm bringing into our home! 
Who's to say that because it's still a tropical island outside it can't be autumn in inside? :)


Saturday, September 17, 2011

Saturday Afternoon Picnik - collage

A couple weeks ago Picnik started allowing you to layer photos.  Before this my biggest complaint about Picnik was the limited collage options.  I used Picasa to create the collage and then added text and effects with Picnik... well not any longer!  I can do it all in 1 place!

This is an example of how I would make a blog header.

Start by selecting collage on the main page.
collage

I chose the 3 box collage, but only for the shape.  Remember you can move and adjust the pictures in any way you want, and use way more than 3 images! 
In the bottom right corner it says the dimensions... around 1000x400 is a great size for a blog header.  Adjust the proportion to change the dimensions.
2

Click 'Done' and now you  are ready to add pictures from the 'Photo Basket'
3

I start by adding the background images... scrapbook paper, fabrics, or patterns I have created from colourlovers.com
4

I used a muted green and blue color scheme and added the plaid to get a bit of a fall look.
By right clicking on the images you can change the order in which they are layered.
For instance the plaid is much larger than what is shown here, but it is layered behind the stripes.  I right clicked and said 'send to back'
5

Next I added the images of Lee and I that I wanted to use.
6

Once you have all the images in place how you want, now is a good time to save it.  Saving it before you added text or stickers allows the layers to be secured so you don't accidentally drag a photo when you meant to drag the text (trust me it can get frustrating when you're dealing with lots of layers & as of yet Picnik doesn't have a grouping feature to lock in the layers).
It also allows you to go back later and add different text or stickers to the collage if you decide you want something different.
Once it is saved upload it to Picnik and open it as you would any other picture to be edited.
7

Next add text if you want to.  This is from one of my favorite songs...
9

I added a few 'whimsy trees' to my collage since it is fall after all.
8


And you're done!
fall collage


Today I signed up with Picket Fence Blogs! and I realized that my blog button was super tiny... but hopefully that's fixed now!  Both are on the sidebars... let me know if you have any feedback for me.
Have you been picnik'ing anything fun??


Friday, September 16, 2011

almost copy-kat art

One of my character flaws is that I don't like to copy things (hence my love/hate relationship with pinterest) 
I want to be creative all on my own. be original.
But the truth is.... I'm not really all that one of a kind.
Many of the ideas I have seem original to me, but someone else has already thought of it.
To deal with this I'd like to call myself the "almost copy-kat"
I see something I like and then try to put my own spin on it.

I am a supporter of trying to re-create art for yourself.
Art is so expensive. eesh.
I'm that over-confident person who refuses to buy anything that I think I can make myself.
Sometimes it turns out good... and sometimes it is just an outlet for when I get that urge to paint or draw.

Last week I tried my hand at re-creating a favorite image of mine from pinterest.
that sea horse I used for inspiration for my sea glass sea horse.


I used some really thin sharpie markers that my friend from college Tiffany gave me when I was home.  She donate SO much awesome stuff to our after school program - the kids love the books she sent and I've been getting lots of use out of the sharpies! and not just for art purposes ;)
Tiffany has a super cute blog - Teach.Run.Love.
If you like running (she's about to do her 4th half marathon), teaching 1st graders, or cooking check her out!

ok end of commercial break.
back to sea horses.

IMG_0165
my version.  It is draw on 8x10 paper.

But I couldn't stop there.  I was loving this so I decided to draw a fish in a similar style.

IMG_0167

But you can't stop at 2.  You need at least 3 for a "collection"
So I drew a little jelly fish!

IMG_0168

IMG_0164


The similar style and colors makes them a beautiful grouping!  I cannot wait to frame and display them on a gallery wall when we get an apartment in America!


Related Posts Plugin for WordPress, Blogger...