Saturday, August 20, 2011

a saturday afternoon picnik #5

Twp pieces of good news to share!!

1. Picnik now allows you to layer images!! No more sticking within the square collage boxes, you can go crazy and create your own collage! Wonderful!

2. My friend Lea (ok I admit it's another friend that I've never met in real life, but I KNOW we would be friends) is having another baby!! And she asked me to create the blog header to let the world know that her sweet little family is growing!  I'm so honored to be apart of her announcement and I cannot wait to see how precious this 2nd baby is going to be.
Stop by her blog http://rolandbaby.blogspot.com/ and congratulate her!!

This is the celebratory big announcement header, colorful and fun!


And this one is for later on in the fall, when she doesn't want a rainbow blog anymore...  
I can't wait to make her a header with her cute little baby bump! So exciting!

If you would like for me to take a stab at a blog header for you shoot me an email at kelsey.coghill@gmail.com


Thursday, August 18, 2011

t-shirt re-style

This is by probably the easiest, quickest thing I've ever done to an article of clothing with the most impact.
I saw this picture on pinterest and knew I wanted to try it.


I have so many clothes here in Grenada that I'm absolutely sick of.  I've worn the same things for 2 years now. boring.
I clicked the link over to  Crafter Hours. (cute name eh?)
who quickly said this wasn't her idea, rather she got it from http://upcyclededucation.blogspot.com/

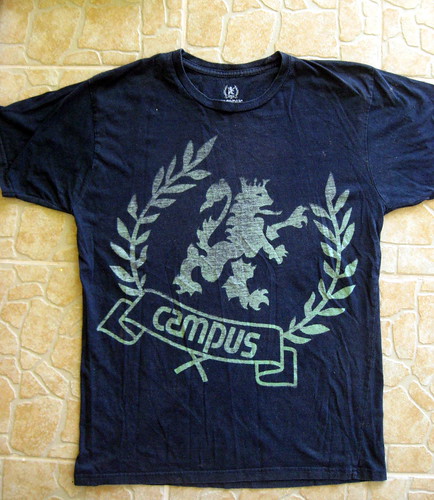
I went into the bedroom, grabbed the first tee shirt I saw, and a pair of scissors.
I didn't take a before picture of me wearing the shirt because I was too excited about the end result to even think about blogging about it.

There is a  funny story behind this tee shirt.  I bought it at Gabriel Brothers for $1 in the men's section (4 years ago) and liked it so much I bought one for my husband (then boyfriend)  and promised I'd never wear it on the same day as him.  haha. although we have both played tricks on each other by putting it on after we already know the other is wearing it.  and when he saw me cutting it up this morning he was sad, even if he likes to pretend that he hates having the same shirt as me.  but whatever, I totally girl-ified it!

I only varied slightly from the original tutorial and I would recommend using a tee shirt that is on the bigger side, not a form fitting one, I almost made this one too tight.

IMG_6541
& our college's colors were blue and green.
skies of blue
fields of green
I pledge my love MVNU :)


IMG_6543
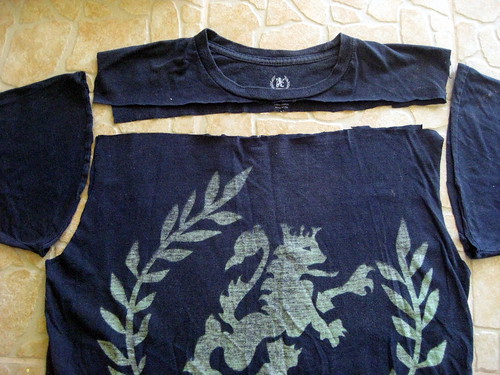
First cut the sleeves off and then cut straight across the top under the collar.
Then (no picture) fold the top down about 1 inch and do a straight stitch across leaving  space to feed through a strap, I hand sewed it but if would be super quick with a machine. 


IMG_6545
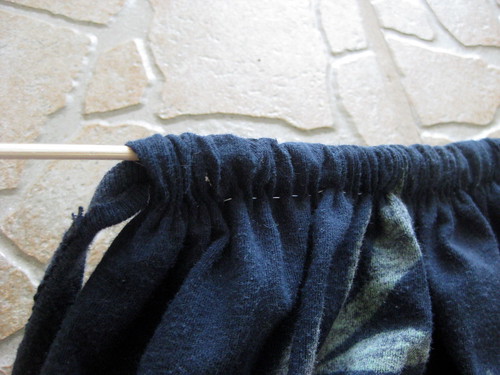
For the strap I used the shirt's original collar, cutting it once to break the circle and make it one long strip.
I then fed it through with a kitchen skewer, or you could use a pencil.

IMG_6550
This is what it looked like once it was fed through the front of the shirt. 
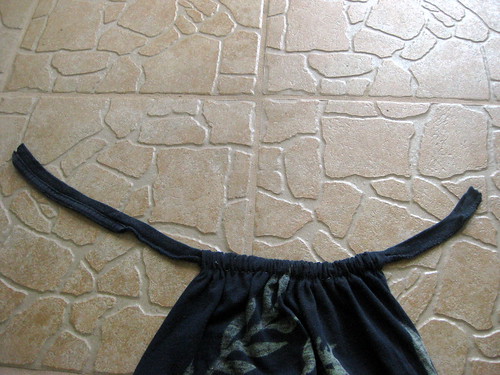
Repeat with the back and re-sew the collar together and tuck it into the back seem to hide the stitches.

IMG_6556
love the new neckline!
IMG_6559
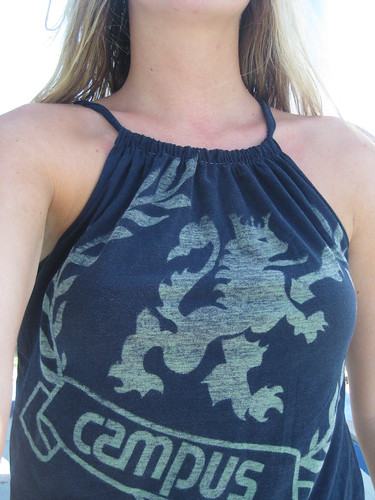
in my back yard with clothes hanging on the line & wet hair.
I couldn't wait 5 minutes to find a better location to take a picture or to put on some make up.
welcome to my impulsive life.
IMG_6560
back view

I already have 5 other tee shirt lined up to get a similar treatment! 
With one of my bigger shirts (since I'll have more fabric) I'm going to make braided straps. fancy shmancy.

This is the perfect re-style to do in Grenada because it is so hot it is uncomfortable to wear shirts with sleeves, and if your shirt is stained... you just cut off the arm pits! I only wish I had thought of this sooner.
thanks pinterest!


Tuesday, August 16, 2011

She's here!

My online blogging buddy Cat is finally here in real life person!
Many of you may be Budget Blonde readers already, remember when I guest posted over there?
Cat's husband is in the MPH/MD program at the same school as my husband and I sorta met Cat online,  baked her husband a cake, soon became friends, and this week finally met each other face to face!
In case anyone is wondering... she is every bit the lovely southern lady she portrays on her blog :)


I wanted to do something nice for her upon her arrival in Grenada, so I baked her a loaf of banana bread.... but when I was pulling it out of the oven I sorta dropped it & the bread fell out of the pan! I was scrambling to get it, burnt my arm, and the bread fell apart. and there were no more bananas. fail.

So I decided I'd make something for her apartment... but I couldn't think of anything until I remembered a post she did about a painting she liked of a ballerina.
I got out my sketch pad, charcoal, and chalks (no paint or canvas) and went to work.... I was happy with how it turned out until I got back on my computer & realized that I need to scroll down, the whole image wasn't showing on the screen.... I didn't give the ballerina feet.  isn't that the most important part? fail.


poor footless ballerina.
Helpful tip - if you make a drawing out of chalk or charcoal you can spray it with aerosol hairspray afterwards and it doesn't smudge!  Good thing a friend had some I could borrow!
we all know I don't fix my hair in Grenada :)


Monday, August 15, 2011

This week in the blog world...

I found all these great DIYs through the blog hops I participated in. 
There are some fabulous, creative people out there!!
Check these out :

This frame is made out of rolled paper!  See the tutorial here at The Lazy Hobbyhopper

See how to make this amazing piece of art over at Salvage Savvy.

Scavenger hunt using paint samples! Match up the colors... love this idea & can't wait to do it with the kids!
Read more at Come Together Kids

Bracelet made out of balloons!!
See how at Michelle Paige

A wedding gift made by My Handcrafted Home

Wall art for a nursery.  Find out how at Away We Go

faux headband!  I will be trying this with the help of The Letter 4


Sunday, August 14, 2011

Jute ampersand

If you've been around my blog much you know that I have developed a love of jute twine.
It's beachy and cheap! 2 of my favorites

Most of my inspiration comes out of the blue and fast, if I have something in my head I must do it NOW.
I woke up with the crafting bug eating away at me and soon decided I wanted to make a 3-D letter.
My 1st thought was of making a letter 'C' and to glue EC coins all over it, like those I made the earrings out of.  I quickly changed my mind to doing the ampersand instead... and after playing around with the coins I decided that it wouldn't look quite as sleek as I wanted so I scratched that and turned to my reliable twine.

IMG_6388
I sketched out an ampersand on the cardboard which was leftover from some packaging
IMG_6389
cut it out
IMG_6395
and started wrapping the twine around
IMG_6396
the back is messy, but no one is going to see it.  I tied a knot when I started and used hot glue to secure it down.
IMG_6398
the angles made it hard to continuously wrap the twine around... so I had to leave some bare spots which I later when back and filled in.
IMG_6442
I decided to dress it up with a couple sand dollars I had laying around and add to it's beachy-ness
It is photographed hanging from our shutters outside because the lighting was much better than inside.

I made this ampersand mostly as another souvenir to take back to America with me in December.  I am running out of space in this tiny apartment to keep up with all my crafting!  I can't stop!

So it gets added to the growing pile of souvenirs I have.  Are there support groups for this type of thing??


IMG_6456

IMG_6455

IMG_6458


linking up with:
http://www.creativejewishmom.com/

Related Posts Plugin for WordPress, Blogger...